Use PorterLB in Layer 2 Mode
This document demonstrates how to use PorterLB in Layer 2 mode to expose a Service backed by two Pods. The Eip, Deployment and Service described in this document are examples only and you need to customize the commands and YAML configurations based on your requirements.
Prerequisites
- You need to prepare a Kubernetes cluster where PorterLB has been installed. All Kubernetes cluster nodes must be on the same Layer 2 network (under the same router).
- You need to prepare a client machine, which is used to verify whether PorterLB functions properly in Layer 2 mode. The client machine needs to be on the same network as the Kubernetes cluster nodes.
- The Layer 2 mode requires your infrastructure environment to allow anonymous ARP/NDP packets. If PorterLB is installed in a cloud-based Kubernetes cluster for testing, you need to confirm with your cloud vendor whether anonymous ARP/NDP packets are allowed. If not, the Layer 2 mode cannot be used.
This document uses the following devices as an example:
| Device Name | IP Address | MAC Address | Description |
|---|---|---|---|
| master1 | 192.168.0.2 | 52:54:22:a3:9a:d9 | Kubernetes cluster master |
| worker-p001 | 192.168.0.3 | 52:54:22:3a:e6:6e | Kubernetes cluster worker 1 |
| worker-p002 | 192.168.0.4 | 52:54:22:37:6c:7b | Kubernetes cluster worker 2 |
| i-f3fozos0 | 192.168.0.5 | 52:54:22:fa:b9:3b | Client machine |
Step 1: Enable strictARP for kube-proxy
In Layer 2 mode, you need to enable strictARP for kube-proxy so that all NICs in the Kubernetes cluster stop answering ARP requests from other NICs and PorterLB handles ARP requests instead.
-
Log in to the Kubernetes cluster and run the following command to edit the kube-proxy ConfigMap:
kubectl edit configmap kube-proxy -n kube-system -
In the kube-proxy ConfigMap YAML configuration, set
data.config.conf.ipvs.strictARPtotrue.ipvs: strictARP: true -
Run the following command to restart kube-proxy:
kubectl rollout restart daemonset kube-proxy -n kube-system
Step 2: Specify the NIC Used for PorterLB
If the node where PorterLB is installed has multiple NICs, you need to specify the NIC used for PorterLB in Layer 2 mode. You can skip this step if the node has only one NIC.
In this example, the master1 node where PorterLB is installed has two NICs (eth0 192.168.0.2 and eth1 192.168.1.2), and eth0 192.168.0.2 will be used for PorterLB.
Run the following command to annotate master1 to specify the NIC:
kubectl annotate nodes master1 layer2.porter.kubesphere.io/v1alpha1="192.168.0.2"
Step 3: Create an Eip Object
The Eip object functions as an IP address pool for PorterLB.
-
Run the following command to create a YAML file for the Eip object:
vi porter-layer2-eip.yaml -
Add the following information to the YAML file:
apiVersion: network.kubesphere.io/v1alpha2
kind: Eip
metadata:
  name: porter-layer2-eip
spec:
  address: 192.168.0.91-192.168.0.100
  interface: eth0
  protocol: layer2
NOTE
-
The IP addresses specified in
spec:addressmust be on the same network segment as the Kubernetes cluster nodes. -
For details about the fields in the Eip YAML configuration, see Configure IP Address Pools Using Eip.
-
-
Run the following command to create the Eip object:
kubectl apply -f porter-layer2-eip.yaml
Step 4: Create a Deployment
The following creates a Deployment of two Pods using the luksa/kubia image. Each Pod returns its own Pod name to external requests.
-
Run the following command to create a YAML file for the Deployment:
vi porter-layer2.yaml -
Add the following information to the YAML file:
apiVersion: apps/v1 kind: Deployment metadata: name: porter-layer2 spec: replicas: 2 selector: matchLabels: app: porter-layer2 template: metadata: labels: app: porter-layer2 spec: containers: - image: luksa/kubia name: kubia ports: - containerPort: 8080 -
Run the following command to create the Deployment:
kubectl apply -f porter-layer2.yaml
Step 5: Create a Service
-
Run the following command to create a YAML file for the Service:
vi porter-layer2-svc.yaml -
Add the following information to the YAML file:
kind: Service
apiVersion: v1
metadata:
  name: porter-layer2-svc
  annotations:
    lb.kubesphere.io/v1alpha1: porter
    protocol.porter.kubesphere.io/v1alpha1: layer2
    eip.porter.kubesphere.io/v1alpha2: porter-layer2-eip
spec:
  selector:
    app: porter-layer2
  type: LoadBalancer
  ports:
    - name: http
      port: 80
      targetPort: 8080
  externalTrafficPolicy: Cluster
NOTE
- You must set
spec:typetoLoadBalancer. - The
lb.kubesphere.io/v1alpha1: porterannotation specifies that the Service uses PorterLB. - The
protocol.porter.kubesphere.io/v1alpha1: layer2annotation specifies that PorterLB is used in Layer 2 mode. - The
eip.porter.kubesphere.io/v1alpha2: porter-layer2-eipannotation specifies the Eip object used by PorterLB. If this annotation is not configured, PorterLB automatically uses the first available Eip object that matches the protocol. You can also delete this annotation and add thespec:loadBalancerIPfield (for example,spec:loadBalancerIP: 192.168.0.91) to assign a specific IP address to the Service. - If
spec:externalTrafficPolicyis set toCluster(default value), PorterLB randomly selects a node from all Kubernetes cluster nodes to handle Service requests. Pods on other nodes can also be reached over kube-proxy. - If
spec:externalTrafficPolicyis set toLocal, PorterLB randomly selects a node that contains a Pod in the Kubernetes cluster to handle Service requests. Only Pods on the selected node can be reached.
- You must set
-
Run the following command to create the Service:
kubectl apply -f porter-layer2-svc.yaml
Step 6: Verify PorterLB in Layer 2 Mode
The following verifies whether PorterLB functions properly.
-
In the Kubernetes cluster, run the following command to obtain the external IP address of the Service:
kubectl get svc porter-layer2-svc
-
In the Kubernetes cluster, run the following command to obtain the IP addresses of the cluster nodes:
kubectl get nodes -o wide
-
In the Kubernetes cluster, run the following command to check the nodes of the Pods:
kubectl get po
NOTE
In this example, the Pods are automatically assigned to different nodes. You can manually assign Pods to different nodes. -
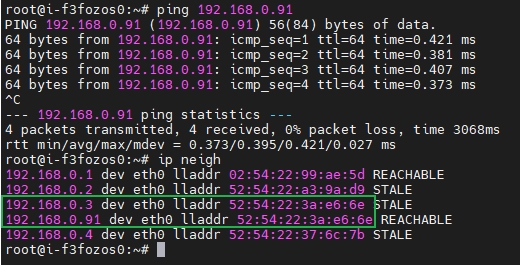
On the client machine, run the following commands to ping the Service IP address and check the IP neighbors:
ping 192.168.0.91ip neigh
In the output of the
ip neighcommand, the MAC address of the Service IP address 192.168.0.91 is the same as that of worker-p001 192.168.0.3. Therefore, PorterLB has mapped the Service IP address to the MAC address of worker-p001. -
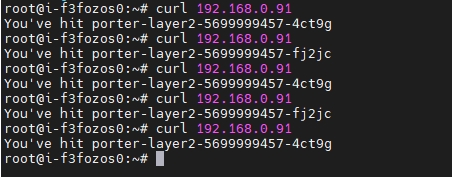
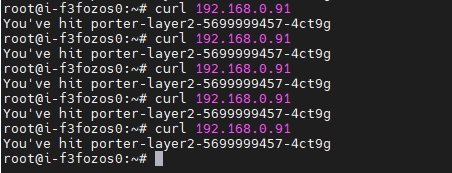
On the client machine, run the following command to access the Service:
curl 192.168.0.91If
spec:externalTrafficPolicyin the Service YAML configuration is set toCluster, both Pods can be reached.
If
spec:externalTrafficPolicyin the Service YAML configuration is set toLocal, only the Pod on the node selected by PorterLB can be reached.
Feedback
Was this page helpful?
Glad to hear it! Please tell us how we can improve.
Sorry to hear that. Please tell us how we can improve.